|
|
Ah, the
joy of cutting into a vehicle that isn't yours. I finally
convinced one of the actual Jeep owners in our outfit (Jared),
to allow me to desecrate their perfectly good Jeep hood. There
are plenty of things you can do to make a Jeep look more aggressive,
large knobby tires, black rims, big scary bumpers, and all kinds of
body armor to name a few. But there's something about hood
vents that adds a certain bad aceness to the look of a hood.
Grand Cherokees, for a time, were even offered with a trim package
that included custom hood louvers. Many other Jeepers have
customized their hoods as well, with other vent styles borrowed from
various vehicles, Pontiac GTP's for instance. Wanting to do
the same thing but still remain original, we looked around at many
different kinds of vents that were out there.
 While
looking, we included in our search, vents that may have never been
intended for hood placement, like the Land Rover style side vents.
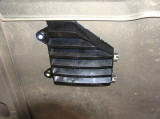
That's when we saw how the H2 vents looked and decided we would try
to make them work for our application. Not wanting to spend
too much money we checked Ebay, but found mostly only billet ones
going for upwards of $200. However, we found one set of stock
plastic ones for $9 and went with them because we still didn't know
if we could even make them work. While
looking, we included in our search, vents that may have never been
intended for hood placement, like the Land Rover style side vents.
That's when we saw how the H2 vents looked and decided we would try
to make them work for our application. Not wanting to spend
too much money we checked Ebay, but found mostly only billet ones
going for upwards of $200. However, we found one set of stock
plastic ones for $9 and went with them because we still didn't know
if we could even make them work. |
 |
When they arrived, it turned out that they
indeed need some modification because they were curved along one
side and in one other spot. We figured since they were made of
hard plastic, all it would take was some heat and pressure and we
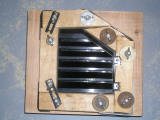
could flatten then out to suit our needs. So not wanting to
give up, we made a way too overly intricate wooden jig that we could
fit the vent in and then cook in the oven, tightening it down all
the while. I know the homemade press looks totally ghetto, but
we managed to make it with what we had laying around instead of
going out and buying things. As a bonus, now whenever we cook
something in the oven it has a nice wood kilned aroma.
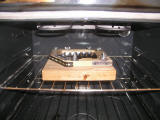
Well after
cooking the vents at 320�, we were able to tighten down all the
butterfly screws as far as they would go. After letting them
cool for a good hour, we removed the vents to find the mounting area
perfectly flat just the way we had wanted. Oh, and the jig
worked for both vents, we just flipped the 2 sides and inserted the
bolts the opposite way. |
 |
 |
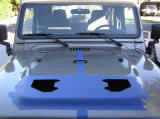
It was finally
time to get down to the destruction part of the job. Jared
decided to opt out of the surgery and turned over the keys, and
possibly, he warned, the title to his baby. I decided to
employ the help and eyes of our good friend Steve for the job.
We made a cutting template and then began the toughest part of the
job, the measuring. We spent so much more time surveying than
we did cutting, wanting to make sure of no unforeseen problems.
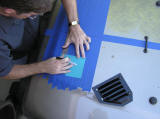
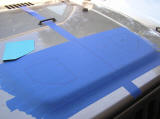
We began with laying down some tape to protect the paint and to make
marking our lines easier. We measured from a bunch of
different points on his Jeep, and every time one of us measured, the
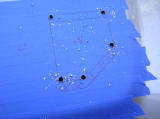
other measured again. After we thought we had the cut lines
laid perfectly out we checked one more thing: underneath the hood.
It turns out at our current marked out positions, we would be
cutting through the hood support, so we re-measured and moved the
vent holes up 3/4 of an inch. We also laid a metal sign
underneath the cuts to prevent us hitting any engine components with
the drill and blade and to keep shavings out of the picture to. |
 |
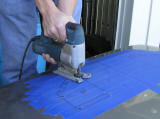
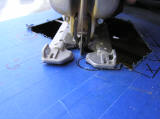
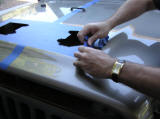
It was finally
time to do the deed. I called J one last time to see if it was
still a go. He confirmed it and I got the drill ready. I
started timidly with a small bit, but after a little hesitation, I
found the metal extremely easy to puncture. And thus the point
of no return had come upon us. I said screw it, threw caution
to the wind and got a bigger drill bit and went to work drilling
holes in the corners of the hole to be. You can see in the
picture how close we got to the hood support. |
 |
After the drilling on the one side was done, I switched out for the
jig saw. I was a little scared to use the saw on the hood, but
we had read that a grinder will just heat up the metal too much and
ruin the paint. So we got a nice metal cutting blade for
Steve's Bosch. I must say I
was surprised at how easy the blade cut through the metal.
Maintaining a straight cut line was a nonplus. The cutting was
done almost before I had started, and when it was done, we had what
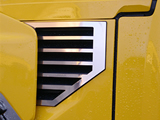
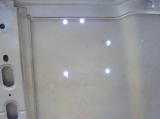
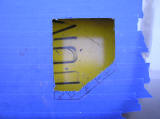
we wanted, a great big hole in Jared's hood. The hole had
turned out so perfect that the vent fit in nice and snuggly.
We went ahead and kept and used the mounting clips that were already
on one of the vent sides.
The vents also had countersunk mount
holes that were going to have to be dealt with. Instead of
cutting a nice pretty hole for them to sit in, we just cut a notch
out for each one since no one would be seeing it anyway. We
were going to mount the vents with 3M tape, but we figured we'd
still fill the mounting holes with screws for aesthetic appeal.
Pretty soon we had the other side all
cut out and it was time to finally remove the tape. When we
did we were pretty amazed that the paint showed no signs of duress
around our cuts; it was still in perfect condition. We did
take a couple q-tips and some rustoleum and touched up around the
cuts to prevent any future rust. |
 |
 |
 |
 |
 |
 |
 |
|


